We ❤️ Open Source
A community education resource
Building a RAG system with Google’s Gemma, Hugging Face, and MongoDB
Learn how to build an end-to-end RAG system with an open source base in this tutorial.

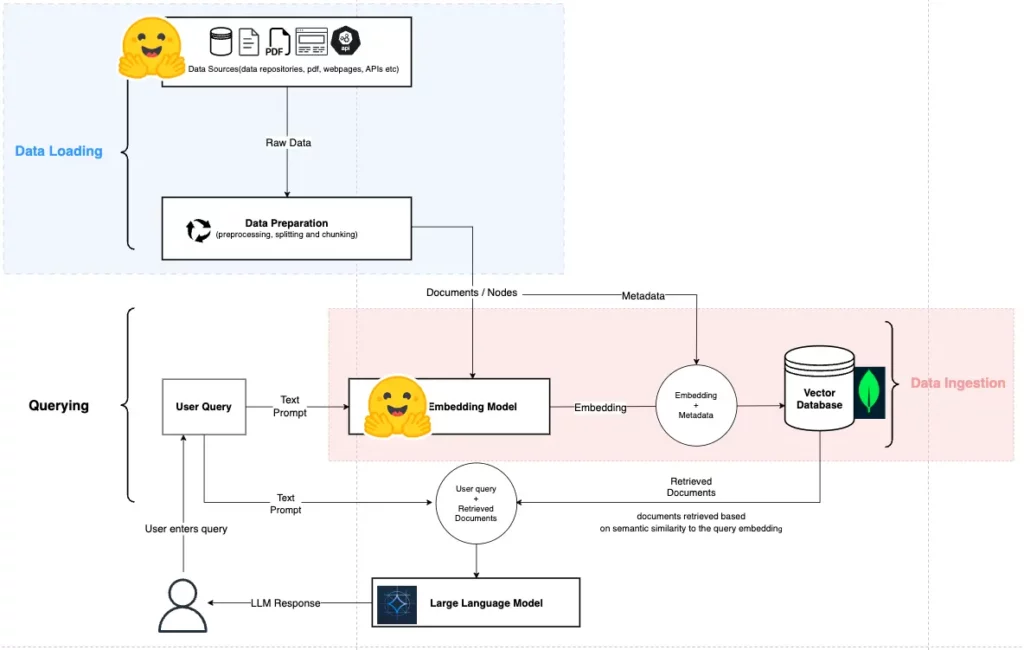
Introduction
Google released a state-of-the-art open model into the AI community called Gemma. Specifically, Google released four variants of Gemma: Gemma 2B base model, Gemma 2B instruct model, Gemma 7B base model, and Gemma 7B instruct model. The Gemma open model and its variants utilise similar building blocks as Gemini, Google’s most capable and efficient foundation model built with Mixture-of-Expert (MoE) architecture.
This article presents how to leverage Gemma as the foundation model in a retrieval-augmented generation (RAG) pipeline or system, with supporting models provided by Hugging Face, a repository for open source models, datasets, and compute resources. The AI stack presented in this article utilises the GTE large embedding models from Hugging Face and MongoDB as the vector database.
Here’s what to expect from this article:
- Quick overview of a RAG system
- Information on Google’s latest open model, Gemma
- Utilising Gemma in a RAG system as the base model
- Building an end-to-end RAG system with an open source base and embedding models from Hugging Face
Step 1: Installing libraries
All implementation steps can be accessed in the repository, which has a notebook version of the RAG system presented in this article.
The shell command sequence below installs libraries for leveraging open source large language models (LLMs), embedding models, and database interaction functionalities. These libraries simplify the development of a RAG system, reducing the complexity to a small amount of code:
!pip install datasets pandas pymongo sentence_transformers
!pip install -U transformers
# Install below if using GPU
!pip install accelerate- PyMongo: A Python library for interacting with MongoDB that enables functionalities to connect to a cluster and query data stored in collections and documents.
- Pandas: Provides a data structure for efficient data processing and analysis using Python.
- Hugging Face datasets: Holds audio, vision, and text datasets.
- Hugging Face Accelerate: Abstracts the complexity of writing code that leverages hardware accelerators such as GPUs. Accelerate is leveraged in the implementation to utilise the Gemma model on GPU resources.
- Hugging Face Transformers: Access to a vast collection of pre-trained models.
- Hugging Face Sentence Transformers: Provides access to sentence, text, and image embeddings.
Step 2: Data sourcing and preparation
The data utilised in this tutorial is sourced from Hugging Face datasets, specifically the AIatMongoDB/embedded_movies dataset.
A datapoint within the movie dataset contains attributes specific to an individual movie entry; plot, genre, cast, runtime, and more are captured for each data point. After loading the dataset into the development environment, it is converted into a Pandas DataFrame object, which enables efficient data structure manipulation and analysis.
# Load Dataset
from datasets import load_dataset
import pandas as pd
# https://huggingface.co/datasets/MongoDB/embedded_movies
dataset = load_dataset("MongoDB/embedded_movies")
# Convert the dataset to a pandas DataFrame
dataset_df = pd.DataFrame(dataset['train'])
The operations within the following code snippet below focus on enforcing data integrity and quality.
- The first process ensures that each data point’s
fullplotattribute is not empty, as this is the primary data we utilise in the embedding process. - This step also ensures we remove the
plot_embeddingattribute from all data points as this will be replaced by new embeddings created with a different embedding model, thegte-large.
# Remove data point where plot column is missing
dataset_df = dataset_df.dropna(subset=['fullplot'])
print("\nNumber of missing values in each column after removal:")
print(dataset_df.isnull().sum())

# Remove the plot_embedding from each data point in the dataset as we are going to create new embeddings with an open source embedding model from Hugging Face: gte-large
dataset_df = dataset_df.drop(columns=['plot_embedding'])
Step 3: Generating embeddings
Embedding models convert high-dimensional data such as text, audio, and images into a lower-dimensional numerical representation that captures the input data’s semantics and context. This embedding representation of data can be used to conduct semantic searches based on the positions and proximity of embeddings to each other within a vector space.
The embedding model used in the RAG system is the Generate Text Embedding (GTE) model, based on the BERT model. The GTE embedding models come in three variants, mentioned below, and were trained and released by Alibaba DAMO Academy, a research institution.
| Model | Dimension | Massive Text Embedding Benchmark (MTEB) Leaderboard Retrieval (Average) |
|---|---|---|
| GTE-large | 1024 | 52.22 |
| GTE-base | 768 | 51.14 |
| GTE-small | 384 | 49.46 |
| text-embedding-ada-002 | 1536 | 49.25 |
| text-embedding-3-small | 256 | 51.08 |
| text-embedding-3-large | 256 | 51.66 |
In the comparison between open source embedding models GTE and embedding models provided by OpenAI, the GTE-large embedding model offers better performance on retrieval tasks but requires more storage for embedding vectors compared to the latest embedding models from OpenAI. Notably, the GTE embedding model can only be used on English texts.
The code snippet below demonstrates generating text embeddings based on the text in the “fullplot” attribute for each movie record in the DataFrame. Using the SentenceTransformers library, we get access to the “thenlper/gte-large” model hosted on Hugging Face. If your development environment has limited computational resources and cannot hold the embedding model in RAM, utilise other variants of the GTE embedding model: gte-base or gte-small.
The steps in the code snippets are as follows:
- Import the
SentenceTransformerclass to access the embedding models. - Load the embedding model using the
SentenceTransformerconstructor to instantiate thegte-largeembedding model. - Define the
get_embedding function, which takes a text string as input and returns a list of floats representing the embedding. The function first checks if the input text is not empty (after stripping whitespace). If the text is empty, it returns an empty list. Otherwise, it generates an embedding using the loaded model. - Generate embeddings by applying the
get_embeddingfunction to the “fullplot” column of thedataset_dfDataFrame, generating embeddings for each movie’s plot. The resulting list of embeddings is assigned to a new column named embedding.
    from sentence_transformers import SentenceTransformer
    # https://huggingface.co/thenlper/gte-large
    embedding_model = SentenceTransformer("thenlper/gte-large")

    def get_embedding(text: str) -> list[float]:
        if not text.strip():
            print("Attempted to get embedding for empty text.")
            return []

        embedding = embedding_model.encode(text)

        return embedding.tolist()

    dataset_df["embedding"] = dataset_df["fullplot"].apply(get_embedding)
After this section, we now have a complete dataset with embeddings that can be ingested into a vector database, like MongoDB, where vector search operations can be performed.
Step 4: Database setup and connection
Before moving forward, ensure the following prerequisites are met
- Database cluster set up on MongoDB Atlas
- Obtained the URI to your cluster
For assistance with database cluster setup and obtaining the URI, refer to our guide for setting up a MongoDB cluster and getting your connection string. Alternatively, follow Step 5 of this article on using embeddings in a RAG system, which offers detailed instructions on configuring and setting up the database cluster.
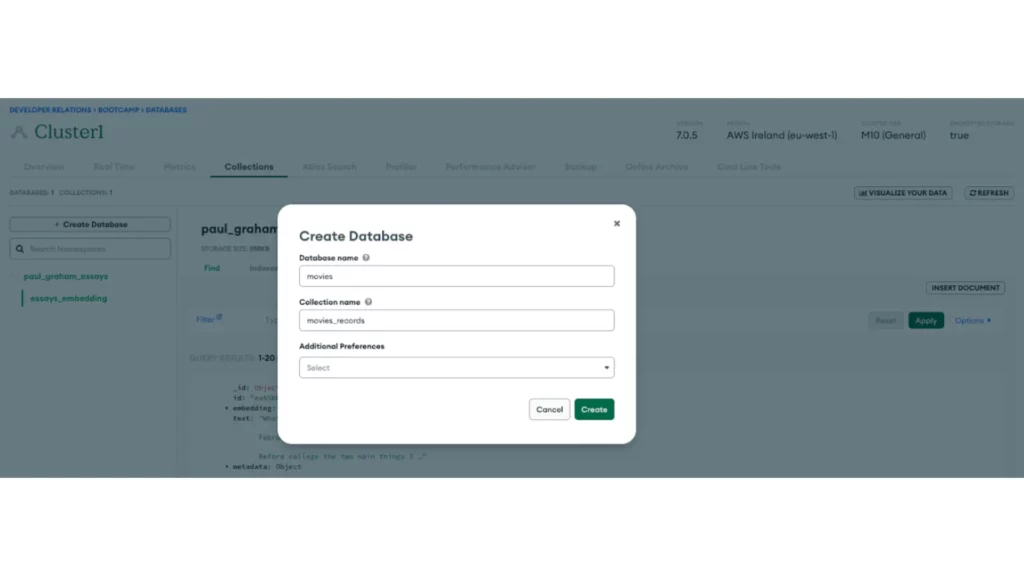
Once you have created a cluster, create the database and collection within the MongoDB Atlas cluster by clicking + Create Database. The database will be named movies, and the collection will be named movies_records.
Ensure the connection URI is securely stored within your development environment after setting up the database and obtaining the Atlas cluster connection URI.
This guide uses Google Colab, which offers a feature for the secure storage of environment secrets. These secrets can then be accessed within the development environment. Specifically, the code mongo_uri = userdata.get('MONGO_URI') retrieves the URI from the secure storage. You can click on the “key” icon to the right-hand side of the Colab Notebook, to set values for secrets.
The code snippet below also utilises PyMongo to create a MongoDB client object, representing the connection to the cluster and enabling access to its databases and collections.
import pymongo
from google.colab import userdata

def get_mongo_client(mongo_uri):
   """Establish connection to the MongoDB."""
   try:
       client = pymongo.MongoClient(mongo_uri)
       print("Connection to MongoDB successful")
       return client
   except pymongo.errors.ConnectionFailure as e:
       print(f"Connection failed: {e}")
       return None

mongo_uri = userdata.get("MONGO_URI")
if not mongo_uri:
   print("MONGO_URI not set in environment variables")

mongo_client = get_mongo_client(mongo_uri)

# Ingest data into MongoDB
db = mongo_client["movies"]
collection = db["movie_collection_2"]
The following code guarantees that the current database collection is empty by executing the delete_many() operation on the collection.
# Delete any existing records in the collection
collection.delete_many({})
Step 5: Vector search index creation
Creating a vector search index within the movies_records collection is essential for efficient document retrieval from MongoDB into our development environment. To achieve this, refer to the official vector search index creation guide.
In the creation of a vector search index using the JSON editor on MongoDB Atlas, ensure your vector search index is named vector_index and the vector search index definition is as follows:
{
"fields": [{
    "numDimensions": 1024,
    "path": "embedding",
    "similarity": "cosine",
    "type": "vector"
  }]
}
The 1024 value of the numDimension field corresponds to the dimension of the vector generated by the gte-large embedding model. If you use the gte-base or gte-small embedding models, the numDimension value in the vector search index must be set to 768 and 384, respectively.
Step 6: Data ingestion and Vector Search
Up to this point, we have successfully done the following:
- Loaded data sourced from Hugging Face
- Provided each data point with embedding using the GTE-large embedding model from Hugging Face
- Set up a MongoDB database designed to store vector embeddings
- Established a connection to this database from our development environment
- Defined a vector search index for efficient querying of vector embeddings
Ingesting data into a MongoDB collection from a pandas DataFrame is a straightforward process that can be efficiently accomplished by converting the DataFrame into dictionaries and then utilising the insert_many method on the collection to pass the converted dataset records.
documents = dataset_df.to_dict('records')
collection.insert_many(documents)
print("Data ingestion into MongoDB completed")
The operations below are performed in the code snippet:
- Convert the dataset DataFrame to a dictionary using the
to_dict('records')method ondataset_df. This method transforms the DataFrame into a list of dictionaries. Therecordsparameter is crucial as it encapsulates each row as a single dictionary. - Ingest data into the MongoDB vector database by calling the
insert_many(documents)function on the MongoDB collection, passing it the list of dictionaries. MongoDB’sinsert_manyfunction ingests each dictionary from the list as an individual document within the collection.
The following step implements a function that returns a vector search result by generating a query embedding and defining a MongoDB aggregation pipeline.
The pipeline, consisting of the $vectorSearch and $project stages, executes queries using the generated vector and formats the results to include only the required information, such as plot, title, and genres while incorporating a search score for each result.
def vector_search(user_query, collection):
   """
   Perform a vector search in the MongoDB collection based on the user query.

   Args:
   user_query (str): The user's query string.
   collection (MongoCollection): The MongoDB collection to search.

   Returns:
   list: A list of matching documents.
   """

   # Generate embedding for the user query
   query_embedding = get_embedding(user_query)

   if query_embedding is None:
       return "Invalid query or embedding generation failed."

   # Define the vector search pipeline
   pipeline = [
       {
           "$vectorSearch": {
               "index": "vector_index",
               "queryVector": query_embedding,
               "path": "embedding",
               "numCandidates": 150,  # Number of candidate matches to consider
               "limit": 4,  # Return top 4 matches
           }
       },
       {
           "$project": {
               "_id": 0,  # Exclude the _id field
               "fullplot": 1,  # Include the plot field
               "title": 1,  # Include the title field
               "genres": 1,  # Include the genres field
               "score": {"$meta": "vectorSearchScore"},  # Include the search score
           }
       },
   ]

   # Execute the search
   results = collection.aggregate(pipeline)
   return list(results)
The code snippet above conducts the following operations to allow semantic search for movies:
- Define the
vector_searchfunction that takes a user’s query string and a MongoDB collection as inputs and returns a list of documents that match the query based on vector similarity search. - Generate an embedding for the user’s query by calling the previously defined function,
get_embedding, which converts the query string into a vector representation. - Construct a pipeline for MongoDB’s aggregate function, incorporating two main stages:
$vectorSearchand$project. - The
$vectorSearchstage performs the actual vector search. Theindexfield specifies the vector index to utilise for the vector search, and this should correspond to the name entered in the vector search index definition in previous steps. ThequeryVectorfield takes the embedding representation of the use query. Thepathfield corresponds to the document field containing the embeddings. ThenumCandidatesspecifies the number of candidate documents to consider and the limit on the number of results to return. - The
$projectstage formats the results to include only the required fields: plot, title, genres, and the search score. It explicitly excludes the_idfield. - The
aggregateexecutes the defined pipeline to obtain the vector search results. The final operation converts the returned cursor from the database into a list.
Step 7: Handling user queries and loading Gemma
The code snippet defines the function get_search_result, a custom wrapper for performing the vector search using MongoDB and formatting the results to be passed to downstream stages in the RAG pipeline.
def get_search_result(query, collection):

   get_knowledge = vector_search(query, collection)

   search_result = ""
   for result in get_knowledge:
       search_result += f"Title: {result.get('title', 'N/A')}, Plot: {result.get('fullplot', 'N/A')}\n"

   return search_result
The formatting of the search results extracts the title and plot using the get method and provides default values (“N/A”) if either field is missing. The returned results are formatted into a string that includes both the title and plot of each document, which is appended to search_result, with each document’s details separated by a newline character.
The RAG system implemented in this use case is a query engine that conducts movie recommendations and provides a justification for its selection.
# Conduct query with retrieval of sources
query = "What is the best romantic movie to watch and why?"
source_information = get_search_result(query, collection)
combined_information = f"Query: {query}\nContinue to answer the query by using the Search Results:\n{source_information}."
print(combined_information)
A user query is defined in the code snippet above; this query is the target for semantic search against the movie embeddings in the database collection. The query and vector search results are combined into a single string to pass as a full context to the base model for the RAG system.
The following steps below load the Gemma-2b instruction model (“google/gemma-2b-it”) into the development environment using the Hugging Face Transformer library. Specifically, the code snippet below loads a tokenizer and a model from the Transformers library by Hugging Face.
from transformers import AutoTokenizer, AutoModelForCausalLM

tokenizer = AutoTokenizer.from_pretrained("google/gemma-2b-it")
# CPU Enabled uncomment below 👇🏽
# model = AutoModelForCausalLM.from_pretrained("google/gemma-2b-it")
# GPU Enabled use below 👇🏽
model = AutoModelForCausalLM.from_pretrained("google/gemma-2b-it", device_map="auto")
Here are the steps to load the Gemma open model:
- Import
AutoTokenizerandAutoModelForCausalLMclasses from the transformers module. - Load the tokenizer using the
AutoTokenizer.from_pretrainedmethod to instantiate a tokenizer for the “google/gemma-2b-it” model. This tokenizer converts input text into a sequence of tokens that the model can process. - Load the model using the
AutoModelForCausalLM.from_pretrainedmethod. There are two options provided for model loading, and each one accommodates different computing environments. - CPU usage: For environments only utilising CPU for computations, the model can be loaded without specifying the
device_mapparameter. - GPU usage: The
device_map="auto"parameter is included for environments with GPU support to map the model’s components automatically to available GPU compute resources.
# Moving tensors to GPU
input_ids = tokenizer(combined_information, return_tensors="pt").to("cuda")
response = model.generate(**input_ids, max_new_tokens=500)
print(tokenizer.decode(response[0]))
The steps to process user inputs and Gemma’s output are as follows:
- Tokenize the text input
combined_informationto obtain a sequence of numerical tokens as PyTorch tensors; the result of this operation is assigned to the variableinput_ids. - The
input_idsare moved to the available GPU resource using the `.to(“cuda”)` method; the aim is to speed up the model’s computation. - Generate a response from the model by involving the
model.generatefunction with the input_ids tensor. The max_new_tokens=500 parameter limits the length of the generated text, preventing the model from producing excessively long outputs. - Finally, decode the model’s response using the
tokenizer.decodemethod, which converts the generated tokens into a readable text string. Theresponse[0]accesses the response tensor containing the generated tokens.
| Query | Gemma’s responses |
|---|---|
| What is the best romantic movie to watch and why? | Based on the search results, the best romantic movie to watch is **Shut Up and Kiss Me!** because it is a romantic comedy that explores the complexities of love and relationships. The movie is funny, heartwarming, and thought-provoking |
Conclusion
The implementation of a RAG system in this article utilised entirely open datasets, models, and embedding models available via Hugging Face. Utilising Gemma, it’s possible to build RAG systems with models that do not rely on the management and availability of models from closed-source model providers.
The advantages of leveraging open models include transparency in the training details of models utilised, the opportunity to fine-tune base models for further niche task utilisation, and the ability to utilise private sensitive data with locally hosted models.
To better understand open vs. closed models and their application to a RAG system, we have an article implements an end-to-end RAG system using the POLM stack, which leverages embedding models and LLMs provided by OpenAI.
All implementation steps can be accessed in the repository, which has a notebook version of the RAG system presented in this article.
FAQs
1. What are the Gemma models? Gemma models are a family of lightweight, state-of-the-art open models for text generation, including question-answering, summarisation, and reasoning. Inspired by Google’s Gemini, they are available in 2B and 7B sizes, with pre-trained and instruction-tuned variants.
2. How do Gemma models fit into a RAG system?
In a RAG system, Gemma models are the base model for generating responses based on input queries and source information retrieved through vector search. Their efficiency and versatility in handling a wide range of text formats make them ideal for this purpose.
3. Why use MongoDB in a RAG system?
MongoDB is used for its robust management of vector embeddings, enabling efficient storage, retrieval, and querying of document vectors. MongoDB also serves as an operational database that enables traditional transactional database capabilities. MongoDB serves as both the operational and vector database for modern AI applications.
4. Can Gemma models run on limited resources?
Despite their advanced capabilities, Gemma models are designed to be deployable in environments with limited computational resources, such as laptops or desktops, making them accessible for a wide range of applications. Gemma models can also be deployed using deployment options enabled by Hugging Face, such as inference API, inference endpoints and deployment solutions via various cloud services.
This article is adapted from “Building a RAG System With Google’s Gemma, Hugging Face and MongoDB” by Richmond Alake, and is republished with permission from the author.

The opinions expressed on this website are those of each author, not of the author's employer or All Things Open/We Love Open Source.